Why You'll Love It
- - No oven required, perfect for hot days
- - Creamy, smooth texture that melts on the tongue
- - Simple pantry ingredients you likely already have
- - Easy to customize with toppings or flavor twists
*"The texture is like a cloud of chocolate, and I didn’t even have to turn on the oven!"*
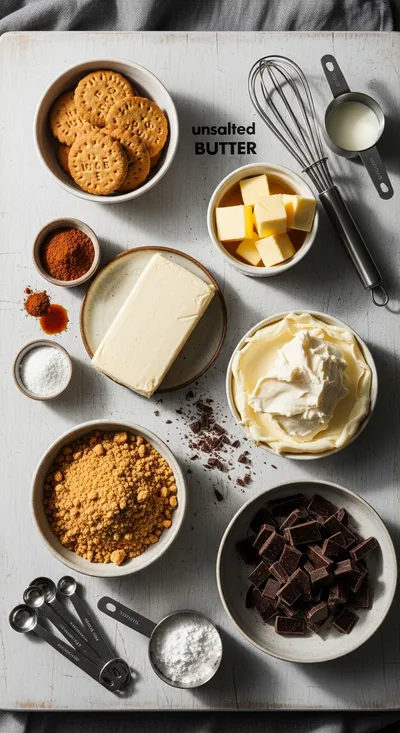
Essential Ingredient Guide
- Cream cheese: Choose full‑fat cream cheese for richness; let it soften at room temperature for a lump‑free batter.
- Dark chocolate: Select a good quality 60‑70% cocoa bar; melt gently over a bain‑marie to preserve the glossy finish.
- Whipped topping: A chilled can of whipping cream adds airy lift; fold in gently to keep the mousse light.
- Vanilla extract: A splash deepens the flavor without overpowering the chocolate.
- Lemon juice: Just a teaspoon brightens the chocolate and helps the filling set.
- Sugar: Adjust to taste; a bit of sweetness balances the bitterness of dark chocolate.
Complete Cooking Process
-
Ingredient Readiness:
Soften the cream cheese, chop the chocolate, and chill the whipping cream before you start.
-
Flavor Development:
Melt the chocolate with a hint of butter, then blend in vanilla and lemon for subtle depth.
-
Texture Control:
Fold the whipped topping into the chocolate mixture just until combined, preserving the airy texture.
-
Finishing Touches:
Spread the filling over the crust, then chill until firm; top with shaved chocolate or berries.
-
Serving Timing:
Serve after at least 4 hours of chilling, or overnight for the best sliceable consistency.
- Use a springform pan for easy removal
- Chill the mixing bowl for the whipped topping
- Add a pinch of sea salt to enhance chocolate flavor
- Garnish with fresh mint for a fragrant finish
Pro Tips
Well, when you’re ready to serve, give the cheesecake a gentle tap to release any air bubbles that might have formed. Then, use a hot, dry knife to slice cleanly—this small step makes each piece look as polished as it tastes. Ugh, I always forget that little trick, but it sure does help.
The essence of the dish:
A fun fact or historical angle:
Flavor or sensory focus:
You Must Know
- Set the cheesecake for at least 4 hours
- Keep crust cool while preparing filling
- Use high‑quality chocolate for shine
Frequently Asked Questions
→ Can I use milk chocolate instead of dark?
Yes, but the cheesecake will be sweeter and less intense. You may want to reduce the added sugar slightly.
→ How long can I store it?
Keep it refrigerated in an airtight container for up to 4 days; the texture stays smooth.
→ Is a springform pan necessary?
It makes removal easier, but a regular round cake pan works if you line it with parchment paper.
→ Can I add fruit toppings?
Absolutely—fresh berries or a raspberry coulis complement the chocolate nicely.
→ What if I don’t have whipped topping?
Whip heavy cream with a bit of sugar and vanilla until stiff; fold it in as you would the canned topping.
→ Is this gluten‑free?
Use gluten‑free graham crackers or almond flour for the crust, and the rest of the recipe is naturally gluten‑free.
Chef's Tips
Make sure the chocolate is not too hot when mixing with the cream cheese; it can melt the cheese.,For a firmer set, add a tablespoon of gelatin dissolved in warm water.,If you prefer a sweeter crust, increase the sugar by one tablespoon.
Nutrition Facts
per serving
420
Calories
7g
Protein
35g
Carbs
28g
Fat
Taste Profile
Rich chocolate with balanced sweetness
Ingredient Substitutions
Don't have an ingredient? Try these alternatives
Will give a grain‑free crust; adjust butter slightly.
Whip cold heavy cream with 1 tbsp sugar for a fresher taste.
Recipe Variations
Try these delicious twists on the original
Spicy Version
Add ½ tsp cayenne pepper and a pinch of smoked paprika to the filling for a subtle heat.
Mediterranean Style
Stir in chopped toasted almonds and a drizzle of honey before chilling.
Common Mistakes to Avoid
Learn from others' mistakes for perfect results
- Over‑mixing the filling, which makes it dense.
- Using hot chocolate that melts the cream cheese.
- Skipping the chill time, leading to a runny texture.
Meal Prep & Storage
Make Ahead Tips
You can prepare the crust and filling up to 24 hours in advance; just keep the cheesecake covered in the fridge.
Leftover Ideas
Reheat gently in a microwave for 10‑15 seconds if you prefer a softer texture, or enjoy straight from the fridge.
Perfect Pairings
Serve this with...
Cooking Timeline
Prepare crust: combine crumbs, butter, sugar; press into pan.
Beat cream cheese, add sugar, vanilla, lemon; blend until smooth.
Stir melted chocolate into cheese mixture; let cool slightly.
Fold whipped topping gently; spread over crust.
Refrigerate for at least 4 hours; garnish before serving.
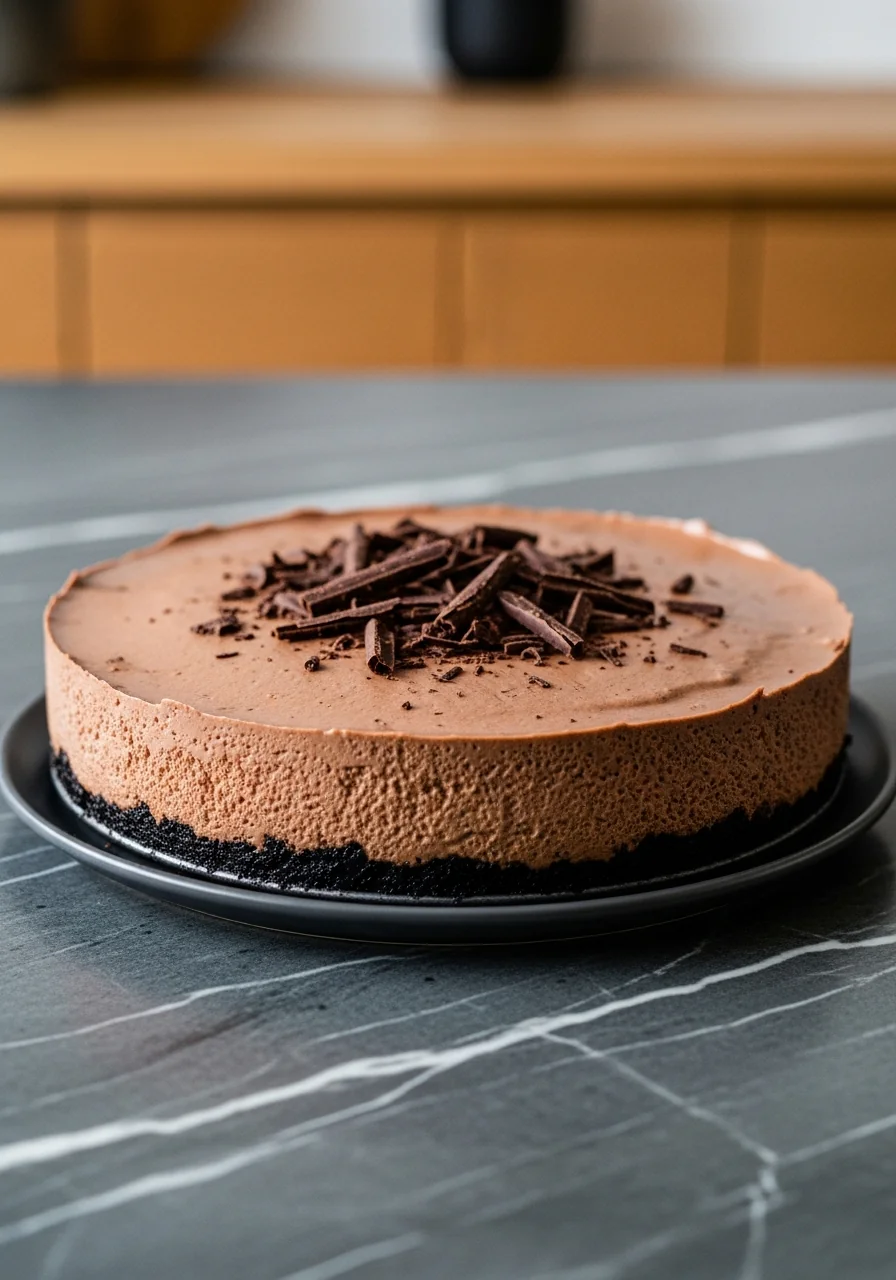
No-Bake Chocolate Cheesecake – Easy Dessert
Indulge in a velvety, rich no‑bake chocolate cheesecake that comes together in minutes, perfect for any gathering or quiet night at home.
Timing
Prep Time
20 Minutes
Cook Time
0 Minutes
Total Time
4 Hours 20 Minutes
Recipe Details
Ingredients
Crust
- 01 1 ½ cups graham cracker crumbs
- 02 ¼ cup melted butter
- 03 2 tbsp sugar
Filling
- 01 16 oz full‑fat cream cheese, softened
- 02 200 g dark chocolate (60‑70% cacao), melted
- 03 ½ cup powdered sugar
- 04 1 tsp vanilla extract
- 05 1 tsp lemon juice
- 06 1 cup chilled whipped topping
Topping
- 01 Chocolate shavings
- 02 Fresh berries (optional)
Instructions
Combine graham cracker crumbs, melted butter, and sugar; press the mixture firmly into the bottom of an 8‑inch springform pan.
In a large bowl, beat the softened cream cheese until smooth, then add powdered sugar, vanilla, and lemon juice; mix until creamy.
Stir the melted dark chocolate into the cream cheese mixture until fully incorporated; set aside to cool slightly.
Fold the chilled whipped topping into the chocolate‑cheese blend gently, preserving the airy texture.
Spread the filling over the prepared crust, smooth the top, and refrigerate for at least 4 hours or overnight. Before serving, garnish with chocolate shavings and optional berries.
Notes & Tips
- 1 Make sure the chocolate is not too hot when mixing with the cream cheese; it can melt the cheese.
- 2 For a firmer set, add a tablespoon of gelatin dissolved in warm water.
- 3 If you prefer a sweeter crust, increase the sugar by one tablespoon.
Tools You'll Need
-
8‑inch springform pan
-
Mixing bowls
-
Electric mixer
-
Spatula
-
Measuring cups and spoons
-
Rubber scraper
Must-Know Tips
- Do not over‑mix the filling; it can become dense.
- Keep the whipped topping very cold for maximum lift.
- Press the crust evenly to avoid crumbs falling out.
Professional Secrets
- Use a double boiler for melting chocolate to keep it smooth.
- Room‑temperature cream cheese blends without lumps.
- Chill the bowl before whipping cream for extra volume.

Recipe by
OliviaOlivia is the creative heart behind Your Website’s ever‑growing collection of home‑cooked classics and modern twists. A graduate of the Culinary Insti ...
Get Delicious Recipes Weekly
Join 25,000+ home cooks getting our best recipes straight to their inbox.
Free forever • No spam • Unsubscribe anytime