Why You'll Love It
- - Easy to assemble, no fancy equipment needed
- - Fun, portable size for picnics or after‑school treats
- - Customize colors and fillings for any occasion
- - Soft crumb meets gentle frosting, a comforting bite
*"These little cakes are a hit at every family gathering – even the kids ask for seconds!"*
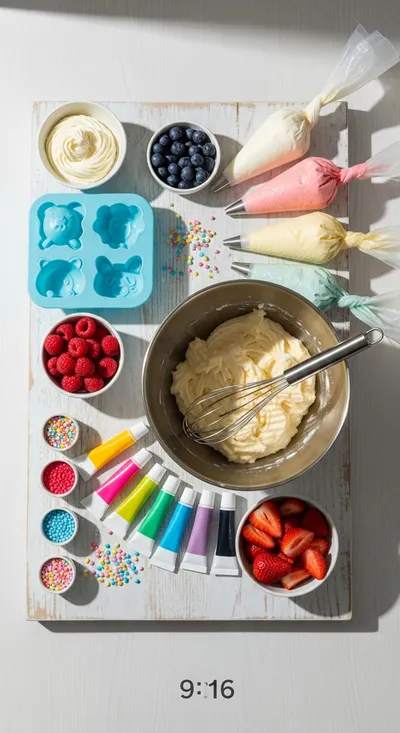
Essential Ingredient Guide
- Butter: Use unsalted, room‑temperature butter for a tender crumb and smooth frosting.
- All‑purpose flour: Sifted flour keeps the cakes light and prevents lumps.
- Food‑grade coloring: A few drops give each cake a gentle hue without altering flavor.
- Vanilla extract: A splash adds warmth; real vanilla is best.
- Lemon juice: A tiny dash brightens the frosting and balances sweetness.
- Powdered sugar: Fine sugar ensures a silky frosting that spreads easily.
Complete Cooking Process
-
Ingredient Readiness:
Measure and sift dry ingredients, soften butter, and preheat the oven to a steady 350°F (175°C).
-
Flavor Development:
Cream butter and sugar until fluffy, then fold in eggs and vanilla; this builds a gentle, sweet base.
-
Texture Control:
Combine wet and dry mixtures just until blended, avoiding over‑mixing that could toughen the crumb.
-
Finishing Touches:
Pipe a thin layer of buttercream onto each cooled mini cake, then add a sprinkle of colored sugar.
-
Serving Timing:
Serve at room temperature; the cakes taste best an hour after frosting as flavors settle.
- Line the mini‑muffin tin with paper liners for easy removal.
- Tap the batter tin gently on the counter to release air bubbles.
- chill the frosting briefly before piping for smoother swirls.
- Store unfinished cakes in a single layer to keep tops flat.
Pro Tips
I often find that a few minutes of quiet while the cakes cool gives me space to think. It’s then that the subtle aroma of vanilla and butter fills the kitchen, reminding me of afternoons spent teaching my grandchildren how to whisk. Take that moment; it makes the whole process feel less like a chore and more like a gentle ritual.
The essence of the dish:
A fun fact or historical angle:
Flavor or sensory focus:
You Must Know
- Do not over‑bake; they should spring back lightly when touched.
- Cool completely before frosting to avoid a soggy top.
- Use a small offset spatula for neat frosting edges.
Frequently Asked Questions
→ Can I use gluten‑free flour?
Yes, substitute an equal amount of a gluten‑free all‑purpose blend; the texture may be slightly denser but still delicious.
→ How long do they keep?
Stored in an airtight container, they stay fresh for up to three days at room temperature.
→ Can I add fresh fruit inside?
Absolutely – a small spoonful of jam or fresh berries between layers adds a lovely burst.
→ Do I need a special pan?
A standard mini‑muffin tin works fine; paper liners make cleanup easy.
→ What if I don’t have food‑grade coloring?
A pinch of cocoa powder for brown, or natural beet juice for pink, can provide gentle hues.
→ Can these be made vegan?
Swap butter for plant‑based margarine and use a flax‑egg or aquafaba; the result is still tender.
Chef's Tips
If you prefer a richer flavor, swap half the milk for buttermilk.,A gentle tap on the tin after filling helps release trapped air for a uniform rise.,For a festive touch, use seasonal fruit purees in the frosting.
Nutrition Facts
per serving
180
Calories
3g
Protein
24g
Carbs
8g
Fat
Taste Profile
A gentle, sweet comfort with a hint of citrus
Ingredient Substitutions
Don't have an ingredient? Try these alternatives
Margarine works well, but coconut oil adds a subtle aroma.
May produce a slightly denser texture; add an extra egg white.
Recipe Variations
Try these delicious twists on the original
Spicy Version
Add a pinch of cayenne to the frosting and garnish with a tiny slice of jalapeño.
Mediterranean Style
Stir crumbled feta and chopped olives into the batter, then top with a drizzle of olive oil.
Common Mistakes to Avoid
Learn from others' mistakes for perfect results
- Over‑mixing batter, which leads to tough cakes.
- Frosting warm cakes, causing frosting to melt.
- Skipping the cooling step, resulting in soggy tops.
Meal Prep & Storage
Make Ahead Tips
You can bake the mini cakes up to two days in advance and store them airtight; frost just before serving for the freshest texture.
Leftover Ideas
Reheat gently in a microwave for 10 seconds or enjoy at room temperature; they stay soft.
Perfect Pairings
Serve this with...
Cooking Timeline
Preheat oven; prepare tin with liners; gather and measure ingredients.
Cream butter and sugar, add eggs and vanilla, then combine wet and dry mixtures.
Fill tin, bake cakes, and set timer.
Cool cakes on rack while preparing buttercream frosting.
Pipe frosting onto each cake and add final garnish.
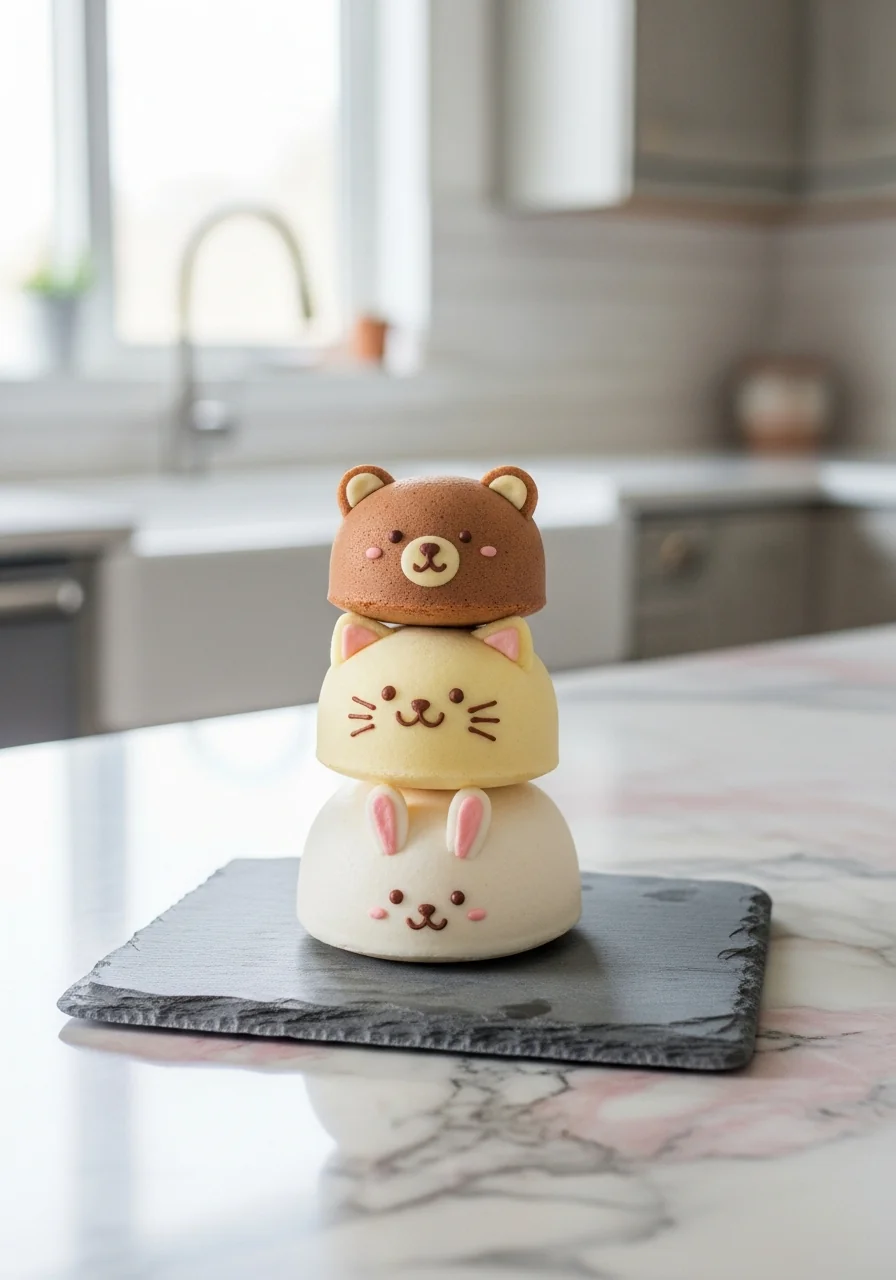
Adorable Bento Cakes Recipe
Learn how to craft cute and tasty bento cakes with easy steps. Perfect for a playful snack or dessert, these adorable bento cakes will wow everyone.
Timing
Prep Time
20 Minutes
Cook Time
15 Minutes
Total Time
35 Minutes
Recipe Details
Ingredients
Cake Batter
- 01 1 cup all‑purpose flour
- 02 ½ cup granulated sugar
- 03 ¼ cup unsalted butter, softened
- 04 2 large eggs
- 05 ¼ cup milk
- 06 1 tsp vanilla extract
- 07 ½ tsp baking powder
- 08 Pinch of salt
Buttercream Frosting
- 01 ½ cup unsalted butter, softened
- 02 1 cup powdered sugar, sifted
- 03 1 tsp vanilla extract
- 04 1 tsp lemon juice
- 05 Food‑grade coloring (optional)
Instructions
Preheat the oven to 350°F (175°C). Line a mini‑muffin tin with paper liners.
In a bowl, cream butter and sugar until light and fluffy; this usually takes about 2‑3 minutes.
Add eggs one at a time, beating well after each, then stir in vanilla.
In a separate bowl whisk flour, baking powder, and salt; gradually add to the wet mixture, alternating with milk, mixing just until combined.
Spoon batter into the prepared tins, filling each about three‑quarters full. Bake 12‑15 minutes, or until a toothpick comes out clean.
Let the mini cakes cool completely on a wire rack before frosting.
While cakes cool, beat butter for the frosting until smooth, then gradually add powdered sugar, vanilla, lemon juice, and a few drops of coloring if desired.
Pipe a small dollop of frosting onto each cooled cake, then garnish with a sprinkle of colored sugar or a tiny edible flower.
Notes & Tips
- 1 If you prefer a richer flavor, swap half the milk for buttermilk.
- 2 A gentle tap on the tin after filling helps release trapped air for a uniform rise.
- 3 For a festive touch, use seasonal fruit purees in the frosting.
Tools You'll Need
-
Mini‑muffin tin
-
Paper liners
-
Electric mixer
-
Spatula
-
Piping bag or zip‑top bag
-
Wire rack
Must-Know Tips
- Don’t over‑mix the batter, it can make the cakes tough.
- Let the buttercream sit a minute before piping for smoother texture.
- Store in a single layer to keep tops soft.
Professional Secrets
- Room temperature butter creates an even emulsion.
- Sifted flour prevents lumps and yields a lighter crumb.
- Cooling completely before frosting avoids a soggy surface.
Recipe by
OliviaOlivia is the creative heart behind Your Website’s ever‑growing collection of home‑cooked classics and modern twists. A graduate of the Culinary Insti ...
Get Delicious Recipes Weekly
Join 25,000+ home cooks getting our best recipes straight to their inbox.
Free forever • No spam • Unsubscribe anytime